
Here is a step-by-step guide to creating a self-hosted WordPress website:
-
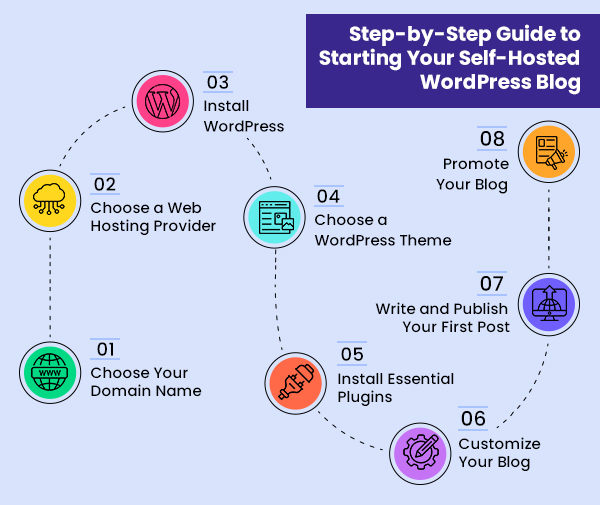
Choose and Register a Domain Name
Pick a unique domain name that represents your website or brand. Register it through a domain registrar. -
Select a Web Hosting Provider
Choose a hosting plan that supports WordPress (most do). Hosting providers store your website files and make your site accessible on the internet. -
Set Up Your Hosting Environment
- If using a local environment (for testing), install a local server software like XAMPP or MAMP.
- For live sites, your hosting provider usually offers a control panel (like cPanel) to manage files and databases.
-
Create a MySQL Database
Use your hosting control panel to create a new MySQL database and user. Note the database name, username, and password for later. -
Download WordPress
Get the latest WordPress package from wordpress.org and extract it. -
Upload WordPress Files
Upload the extracted WordPress files to your hosting server’s root directory (oftenpublic_htmlorwww). If local, place files in the local server’s root folder (e.g.,htdocsin XAMPP). -
Configure wp-config.php
WordPress will prompt you to enter your database details during installation. Alternatively, you can manually create or edit thewp-config.phpfile with your database name, username, password, and host. -
Run the WordPress Installation Script
Open your web browser and go to your domain or local URL followed by/wp-admin/install.php(e.g.,yourdomain.com/wp-admin/install.phporlocalhost/wordpress/wp-admin/install.php).
Follow the on-screen instructions:- Choose your language
- Enter site title
- Create admin username and password
- Provide your email address
- Decide if you want search engines to index your site
-
Complete Installation and Log In
After installation, log in to your WordPress admin dashboard using the credentials you created. -
Customize Your Website
From the dashboard, you can install themes, add plugins, create pages, and start publishing content.
Additional Notes:
-
For local installations (testing on your computer), tools like XAMPP simplify the process by bundling Apache, MySQL, and PHP. After installing XAMPP, start Apache and MySQL, place WordPress files in the
htdocsfolder, create a database via phpMyAdmin, then run the installer vialocalhost/yourfolder. -
For live hosting, your provider often offers one-click WordPress installers or manual setup via FTP and control panel.
-
Make sure your database user has the correct permissions and that the database server is running to avoid installation errors.
This process typically takes less than an hour once you have all the necessary information and access.


Ang PH Ranking ay nag-aalok ng pinakamataas na kalidad ng mga serbisyo sa website traffic sa Pilipinas. Nagbibigay kami ng iba’t ibang uri ng serbisyo sa trapiko para sa aming mga kliyente, kabilang ang website traffic, desktop traffic, mobile traffic, Google traffic, search traffic, eCommerce traffic, YouTube traffic, at TikTok traffic. Ang aming website ay may 100% kasiyahan ng customer, kaya maaari kang bumili ng malaking dami ng SEO traffic online nang may kumpiyansa. Sa halagang 720 PHP bawat buwan, maaari mong agad pataasin ang trapiko sa website, pagandahin ang SEO performance, at pataasin ang iyong mga benta!
Nahihirapan bang pumili ng traffic package? Makipag-ugnayan sa amin, at tutulungan ka ng aming staff.
Libreng Konsultasyon